Microsoft Authenticode on Linux and macOS

With the upcoming releases customers with commercial licenses for Cerbero Suite Advanced and Cerbero Engine can verify Microsoft Authenticode signatures on Linux and macOS. Our Authenticode support includes full-chain certificate and time-stamp verification.

In conjunction with our recently extended support for certificate file formats, this provides complete support for inspecting signed Portable Executable binaries.

The only required step to verify Authenticode signatures on non-Windows systems is to install our “Microsoft Authenticode” package from Cerbero Store.

Cerbero Suite has been using its own implementation of Microsoft Authenticode for performance reasons since the very beginning, back in 2012. However, thanks to the recently introduced Cerbero Store we can now offer this feature on systems other than Windows.

We have also exposed Authenticode validation to our Python SDK.

from Pro.PE import *

print(PE_VerifyAuthenticode(obj))

Alternatively, scan hooking extensions can check the generated report for the validation scan entries.

PE Insider

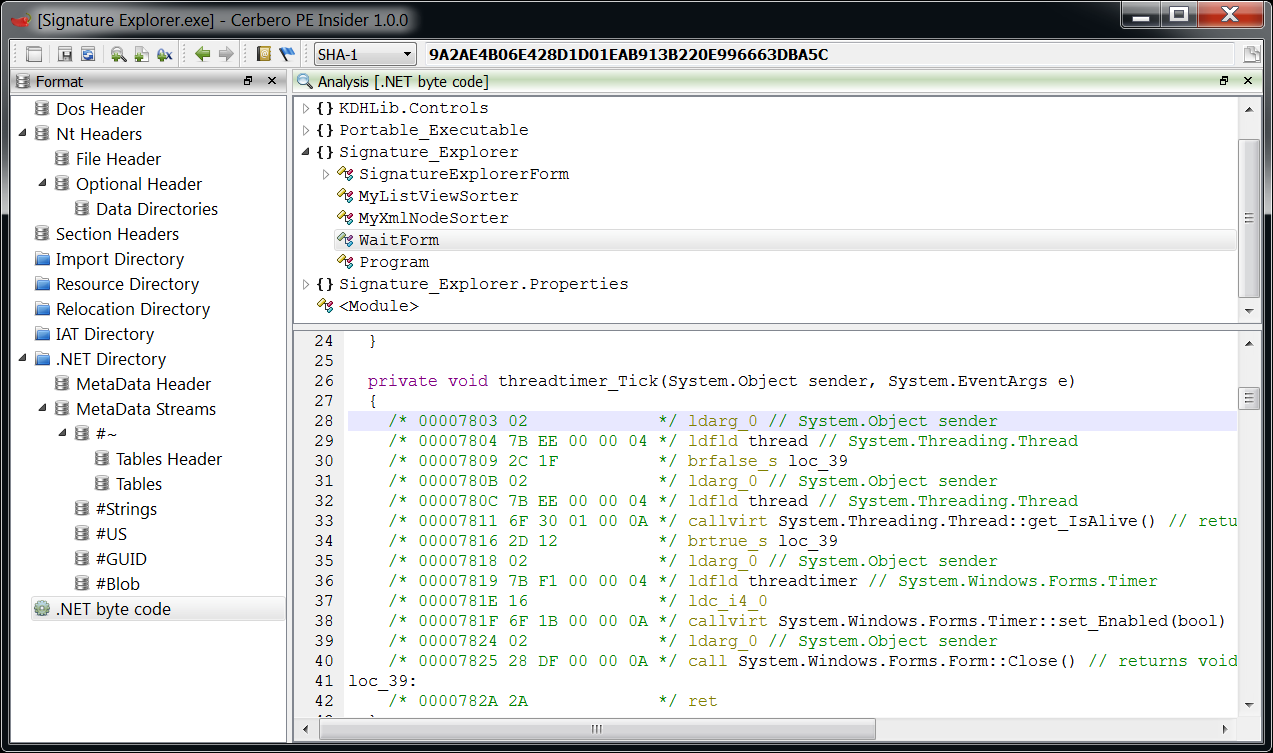
It is always nice to give something back to the community and although this is unfortunately not always possible, we’re happy to announce the release of PE Insider, a free PE viewer which shares the same codebase for inspection as Cerbero Profiler and hence supports the entire PE specification and is incredibly fast and stable. We’re always very busy, but I was finally convinced by Ange Albertini to create this utility. 😉

PE Insider

The utility clearly stands light-years away in terms of functionality compared to the Profiler, but it does have some things which go beyond the simple format inspection including MSIL disassembly, navigation, ranges and resource preview.

Of course there’s room for improvement, but in the meantime here’s a first version. Enjoy!

P.S. To keep up-to-date with news regarding this utility either subscribe to our twitter account or follow the blog.

Validation of Portable Executable resources

One of the new features of the upcoming 0.8.6 version of the Profiler is the validation of resources. This means the Profiler verifies the integrity of resources and lets the user inspect problems, making it easy to discover things like appended files or fake resources. This feature comes handy since very often malware is hidden in resources and droppers often use resources to store their payload.

All the most important resource types are supported:

  • Version info
  • Bitmaps
  • Icons
  • Cursors
  • Icon groups
  • Cursor groups
  • Configuration files
  • Accelerators
  • Menus
  • Dialogs
  • String tables
  • Message tables
  • Any other supported file format

So let’s see a simple test case. What I did is to append a DLL to a bitmap and then replace one of the bitmaps in explorer.exe with my modified one.

I could’ve used any other resource type, or even a PNG or GIF, it wouldn’t have mattered.

The simplified resource tree highlights problems with their risk color, while unsupported types are highlighted in gray.

One can jump to problems with the F2 shortcut, no need to scroll the tree ourselves in search of problems.

In the screenshot above the analysis shown is for my fake bitmap. As it’s possible to see, the bitmap ends where the red-marked data begins.

In this context it is very easy to just load the embedded PE with the “Load as…” (Ctrl+W) command.

And this gives me the opportunity to mention briefly another nice improvement to the hierarchy view.

As you can see files are now grouped according to their type. This makes it much easier to go over the files or to look for specific types. This behavior is optional and can be changed from the settings.

I think I could’ve presented this new feature with a more interesting real-world case. However, there are still some things to do in order for the new version to come out and there wasn’t enough time. I hope, nevertheless, that you enjoyed the post. 🙂

PE analysis (part 1)

This is the first of a series of posts which will be dedicated to PE analysis features. In previous posts we have seen how the Profiler has started supporting PE as a format and while it still lacks support for a few directories (and .NET), it supports enough of them for x86 PE analysis.

PE Analysis 1

While the upcoming version 0.8.4 of the Profiler also features analysis checks as CRC, recursion, metadata, etc., this post will be about the in-depth range analysis for PE files. As the screenshot above previews, in-depth ranges show PE data structures in a hex view and the distribution of data in a PE file.

Let’s take as first sample “kernel32.dll”. After having it opened in the Profiler, let’s execute the “PE->Display ranges” action.

PE ranges action

We get the PE ranges for kernel32.

Kernel32 ranges

The big region of data marked as fluorescent green represents executable code. As you can see, it is interrupted by a gray region of data which the tooltip tells us being a combination of “Code” and “Export Name Data”. If we move the cursor, we can see that it’s not only Export data, but also Import data. Which means that the Export and Import directory are contained in the executable part of the file (the IAT is in the thin gray area at the beginning of the code section). But we may not be interested in having the code section covering other data regions. This is why we can filter what we want to see (Ctrl+B).

PE ranges filter

I unmarked the “Code” range. Thus, we now get all the ranges except the unmarked one.

Kernel32 ranges without code

We can also jump to regions of data, but before seeing that, I want to briefly mention that the hex view can be printed to file/PDF or captured.

Hex View caputre

Not a big feature, but it may come handy when generating reports.

Now let’s look at a file I have especially crafted for the occasion, although it reflects a very common real-world case.

PE high entropy

We’ve got a PE with an extremely high quantity (50%) of foreign data and the entropy level of that data is also extremely high.

So let’s jump to the first occurrence of foreign data (Ctrl+J).

Ranges jump

What we see is that right there where the analyzed PE files finishes, another one has been appended.

Appended PE

So let’s select the contiguous range of data (Ctrl+Alt+A: this will select the foreign range of data) and “Load selection as…” (Ctrl+E) will asks us to select the file type to load (it is automatically identified as being a PE).

Load appended PE

We are now able to analyze the embedded PE file.

Loaded appended PE

While this procedure doesn’t highlight anything new, since loading of embedded files has been featured by the Profiler from its earliest versions, I wanted to show a practical use of it in connection with ranges.

It has to be noted that this particular case is so simple that it can be detected automatically without interaction of the user. In fact, detection of appended files in PEs will be added most probably in version 0.8.5.

Hope you enjoyed this post and stay tuned for the next parts!

PS: take advantage of our promotional offer in time. Prices will be updated in August!
Resource & Load Config Directory

The upcoming 0.8.3 version of the Profiler features two new directories. Most of the work went into implementing an efficient model view controller for the Resource Directory tree.

Resource Directory

Last year I was notified by Ange Albertini that his resourceloop.exe sample crashed the CFF Explorer (by exhausting the stack). Recursion is one of the things to look after when parsing a file as mentioned in my speech about the security of non-executable files. The screenshot below shows Ange’s sample in the Profiler.

Recursive Resource Directory

The red marked Resource Directory Entry points back to the top-level Resource Directory and thus creates a recursion in the tree.

The Profiler is intended to offer complete support for the PE file format, this is why all directories will be supported. One of the directories missing in the CFF Explorer, for instance, is the Load Config (alias SafeSEH).

Load Config Directory

Another small addition is the smart address converter (VA/RVA/Offset). This action guesses the address which needs to be converted from the context. Jumping to a location in the hex view is usually a matter of Ctrl+R and twice Ctrl+Enter.

Address converter

Five directories are still missing: Security, Exception, Bound Import, Delay Import and .NET. The analysis of x86 PEs can already be implemented by adding basic support for the Security Directory. x64 needs Exception as well. Bound and Delay Import support will follow. .NET is the one which has least priority, but it won’t take much time to impelement.

The coming posts about Portable Executable will involve analysis and will be more interesting than this one. So stay tuned. 😉

Portable Executable: coming soon

In the upcoming 0.8.1 release of the Profiler initial support for PE files has been introduced. 🙂

Optional Header

Most of the work went into optimizing the UI and allowing for complex custom views to be built easily, while maintaining great speed. Even the grid control you can see here displayed is a custom control.

In the following screenshot you can see a complex view displaying the section headers.

Section Headers

And here’s a more basic view for the import directory.

Import Directory

Another eye candy screenshot of the section headers with entropy computation for one section.

Section Entropy

What will be present in this first PE edition is mainly about the file format itself. What is going to be missing is a viewer for the resources and one for the .NET directory, because we need first to implement an efficient and customizable tree control. Also ranges won’t be supported as long as the whole file format isn’t supported. This is due to the fact that the PE is one of the most studied and documented file formats around, hence the necessity to be very precise when calculating data ranges.

Also, soon we’ll release a demo of the Profiler. Stay tuned!