Go Binaries (part 2)

We’re currently working on making Go binaries easier to understand using our ultra-fast Carbon disassembler. In the upcoming weeks we’ll keep on posting progress updates.

In the previous part we focused on resolving function names. In this part we focus on resolving strings literals.

Let’s take the following decompiler output for a Go function:

void __stdcall sub_47D590(void)
{
    uint32_t *puVar1;
    int32_t in_FS_OFFSET;
    unk32_t uStack8;
    unk32_t uStack4;
    
    while (puVar1 = (uint32_t *)(**(int32_t **)(in_FS_OFFSET + 0x14) + 8),
          *(BADSPACEBASE **)0x10 < (unk8_t *)*puVar1 ||
          (unk8_t *)*(BADSPACEBASE **)0x10 == (unk8_t *)*puVar1) {
        uStack4 = 0x47D638;
        sub_446900();
    }
    sub_44B9D0("syntax error scanning complex numberuncaching span but s.allocCount == 0) is smaller than minimum pa", 0x24);
    *(unk32_t *)0x532DC8 = uStack8;
    if (*(int32_t *)0x542C70 == 0) {
        *(unk32_t *)0x532DCC = uStack4;
    }
    else {
        sub_448050();
    }
    sub_44B9D0("syntax error scanning booleantimeBegin/EndPeriod not foundtoo many open files in systemtraceback has", 0x1D);
    *(unk32_t *)0x532DC0 = uStack8;
    if (*(int32_t *)0x542C70 == 0) {
        *(unk32_t *)0x532DC4 = uStack4;
    }
    else {
        sub_448050();
    }
    return;
}

It lacks function names and although referenced strings are visible thanks to the heuristics implemented in our decompiler, the size of the strings is incorrect, as the strings are not null-terminated.

By correctly resolving the Go strings, we obtain an improved output:

void __stdcall fmt.init.ializers(void)
{
    uint32_t *puVar1;
    int32_t in_FS_OFFSET;
    unk32_t uStack8;
    unk8_t *puStack4;
    
    while (puVar1 = (uint32_t *)(**(int32_t **)(in_FS_OFFSET + 0x14) + 8),
          *(BADSPACEBASE **)0x10 < (unk8_t *)*puVar1 ||
          (unk8_t *)*(BADSPACEBASE **)0x10 == (unk8_t *)*puVar1) {
        puStack4 = &fmt.init.ializers;
        runtime.morestack_noctxt();
    }
    errors.New("syntax error scanning complex number", 0x24);
    *(unk32_t *)0x532DC8 = uStack8;
    if (*(int32_t *)0x542C70 == 0) {
        *(unk8_t **)0x532DCC = puStack4;
    }
    else {
        runtime.gcWriteBarrier();
    }
    errors.New("syntax error scanning boolean", 0x1D);
    *(unk32_t *)0x532DC0 = uStack8;
    if (*(int32_t *)0x542C70 == 0) {
        *(unk8_t **)0x532DC4 = puStack4;
    }
    else {
        runtime.gcWriteBarrier();
    }
    return;

The same is true for our initial hello world example:

package main

import "fmt"

func main() {
    fmt.Println("Hello, World!")
}

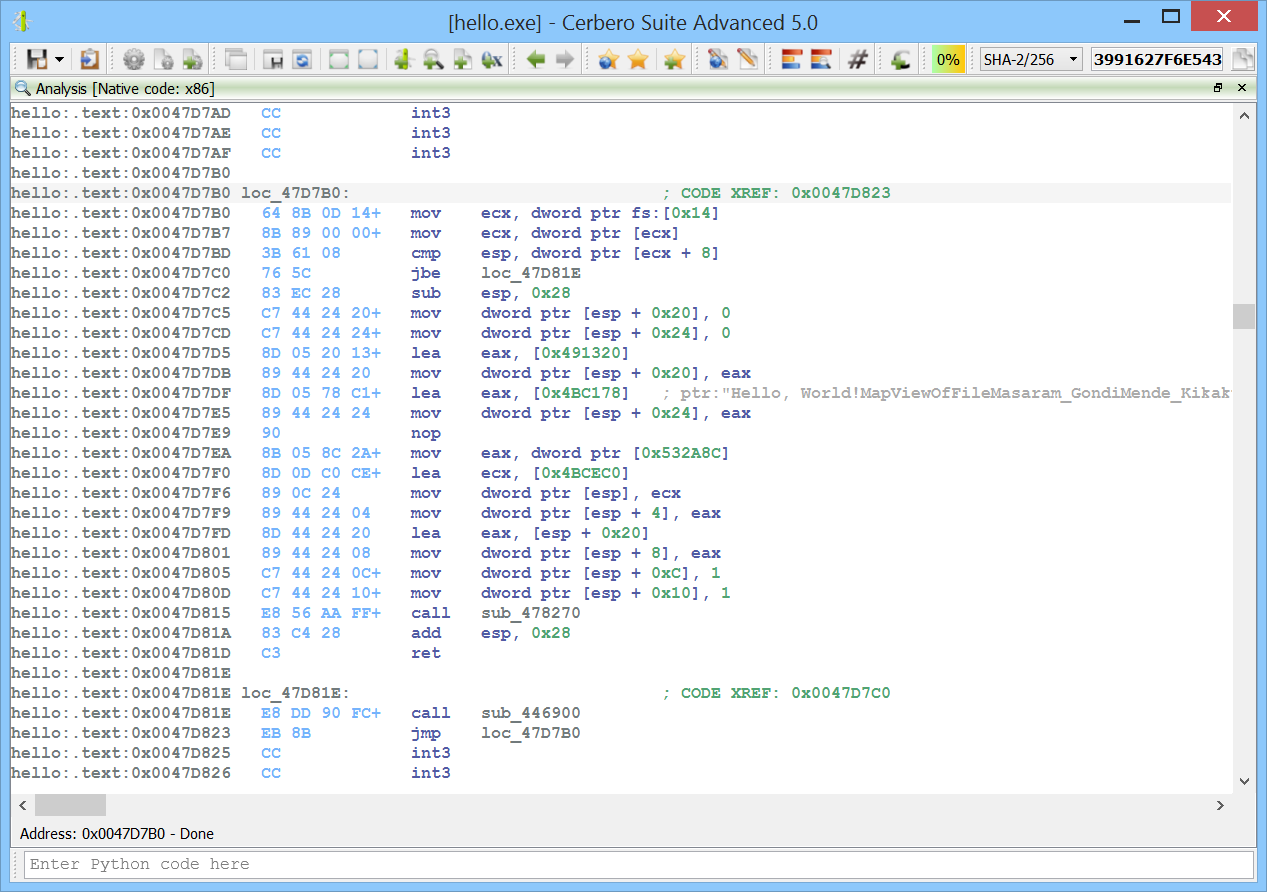
The original decompiler output would be:

void __stdcall sub_47D7B0(void)
{
    uint32_t *puVar1;
    int32_t in_FS_OFFSET;
    unk32_t uStack8;
    unk32_t uStack4;
    
    while (puVar1 = (uint32_t *)(**(int32_t **)(in_FS_OFFSET + 0x14) + 8),
          *(BADSPACEBASE **)0x10 < (unk8_t *)*puVar1 ||
          (unk8_t *)*(BADSPACEBASE **)0x10 == (unk8_t *)*puVar1) {
        uStack4 = 0x47D823;
        sub_446900();
    }
    uStack8 = 0x491320;
    uStack4 = &"Hello, World!MapViewOfFileMasaram_GondiMende_KikakuiOld_HungarianRegDeleteKeyWRegEnumKeyExWRegEnumVa";
    sub_478270(0x4BCEC0, *(unk32_t *)0x532A8C, &uStack8, 1, 1);
    return;
}

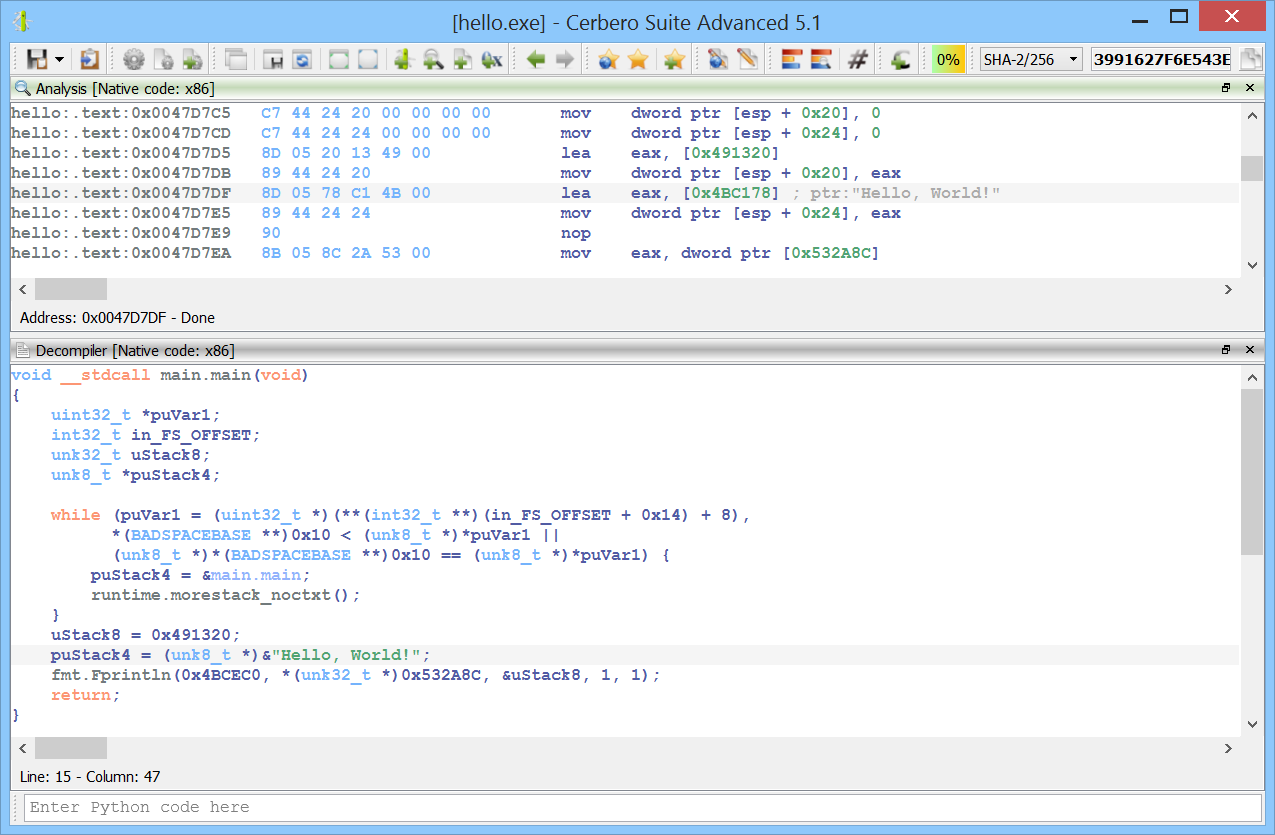
While the newly introduced feature of our decompiler already detects the indirect string literal reference, again the size of the string is wrong.

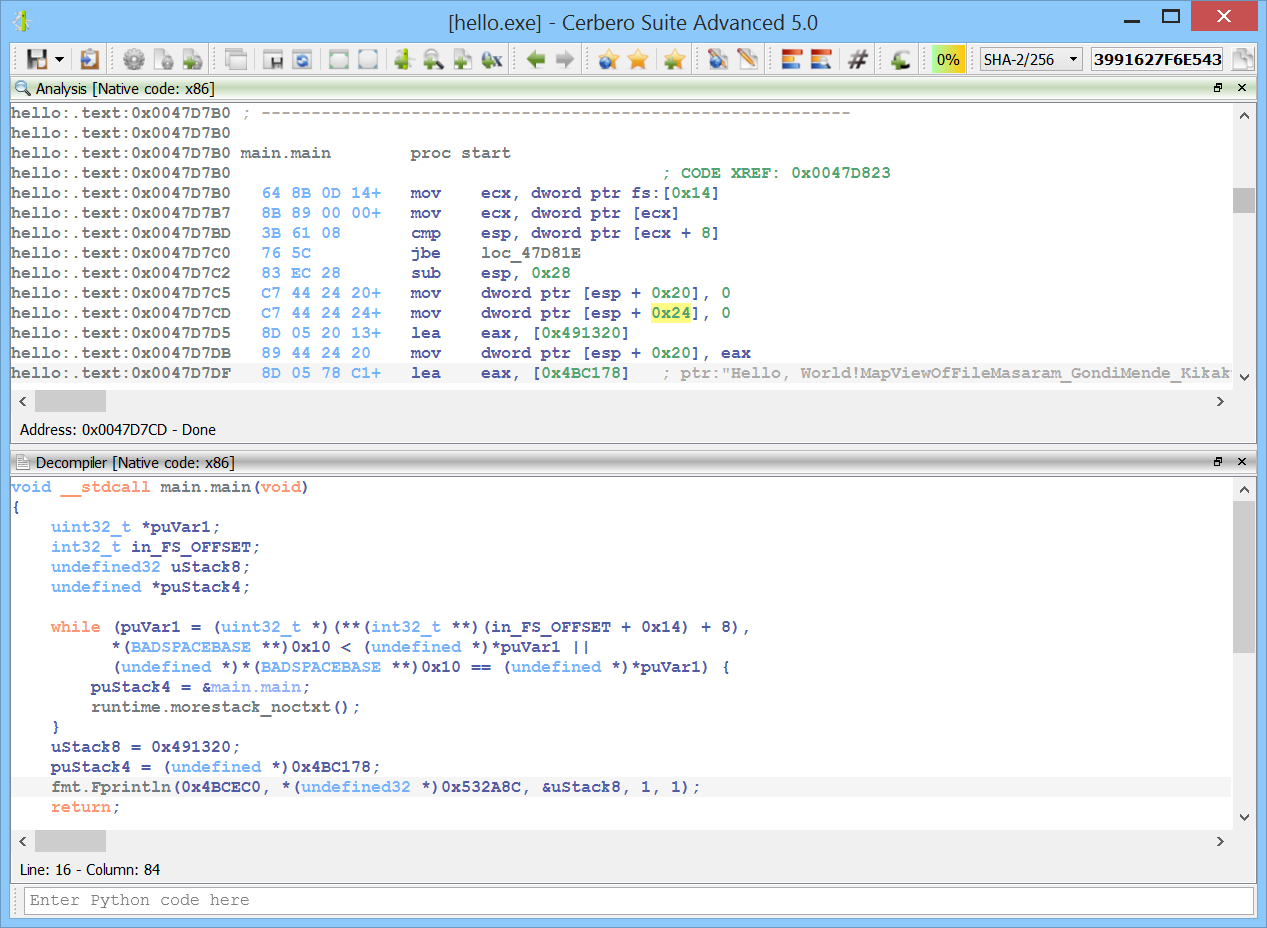
The improved decompiler output is:

void __stdcall main.main(void)
{
    uint32_t *puVar1;
    int32_t in_FS_OFFSET;
    unk32_t uStack8;
    unk8_t *puStack4;
    
    while (puVar1 = (uint32_t *)(**(int32_t **)(in_FS_OFFSET + 0x14) + 8),
          *(BADSPACEBASE **)0x10 < (unk8_t *)*puVar1 ||
          (unk8_t *)*(BADSPACEBASE **)0x10 == (unk8_t *)*puVar1) {
        puStack4 = &main.main;
        runtime.morestack_noctxt();
    }
    uStack8 = 0x491320;
    puStack4 = (unk8_t *)&"Hello, World!";
    fmt.Fprintln(0x4BCEC0, *(unk32_t *)0x532A8C, &uStack8, 1, 1);
    return;
}

While it’s still far from being easy to read, it’s definitely easier to read than before.

To be continued…

Go Binaries (part 1)

We’re currently working on making Go binaries easier to understand using our ultra-fast Carbon disassembler. In the upcoming weeks we’ll be posting progress updates.

Let’s start with a basic hello world example.

package main

import "fmt"

func main() {
    fmt.Println("Hello, World!")
}

Without additional logic, functions name are not available.

We can see the referenced string, although it is not null-terminated, so that we don’t know its length.

The ‘main.main’ function is not treated as a function and even if we define it as such by pressing ‘P’, the decompiled result is hardly intelligible.

void __stdcall sub_47D7B0(void)
{
    uint32_t *puVar1;
    int32_t in_FS_OFFSET;
    undefined32 uStack8;
    undefined32 uStack4;
    
    while (puVar1 = (uint32_t *)(**(int32_t **)(in_FS_OFFSET + 0x14) + 8),
          *(BADSPACEBASE **)0x10 < (undefined *)*puVar1 ||
          (undefined *)*(BADSPACEBASE **)0x10 == (undefined *)*puVar1) {
        uStack4 = 0x47D823;
        sub_446900();
    }
    uStack8 = 0x491320;
    uStack4 = 0x4BC178;
    sub_478270(0x4BCEC0, *(undefined32 *)0x532A8C, &uStack8, 1, 1);
    return;
}

So the first step is recognizing functions and retrieving their names.

void __stdcall main.main(void)
{
    uint32_t *puVar1;
    int32_t in_FS_OFFSET;
    undefined32 uStack8;
    undefined *puStack4;
    
    while (puVar1 = (uint32_t *)(**(int32_t **)(in_FS_OFFSET + 0x14) + 8),
          *(BADSPACEBASE **)0x10 < (undefined *)*puVar1 ||
          (undefined *)*(BADSPACEBASE **)0x10 == (undefined *)*puVar1) {
        puStack4 = &main.main;
        runtime.morestack_noctxt();
    }
    uStack8 = 0x491320;
    puStack4 = (undefined *)0x4BC178;
    fmt.Fprintln(0x4BCEC0, *(undefined32 *)0x532A8C, &uStack8, 1, 1);
    return;

While it's still not easy to read, we can grasp a bit more of its meaning.

To be continued...

Cerbero Suite 3.5 is out!

We’re happy to announce the release of Cerbero Suite 3.5!

This is a single feature release: it includes integration of the Ghidra decompiler (Sleigh) in our Carbon disassembler. No Ghidra or Java installation is necessary!

The decompiler features navigation, comments and renaming of functions, labels and variables.

If you like the idea, we can further expand the functionality and improve the output in next releases!

Happy hacking!

String decryption with Carbon

Developing Carbon, I haven’t had the time to play much with it myself. 🙂 One of the most essential features in a disassembler is the capability to let the users write scripts and modify the disassembly itself. Carbon has a rich SDK and this is a little tutorial to introduce a bit how it works.

Before trying out any of the scripts in this tutorial, make sure to update to the newest 3.0.2 version, as we just fixed a few bugs related to the Carbon Python SDK.

So let’s start!

I wrote a small program with some encrypted strings.

#include <stdio.h>

unsigned char s1[13] = { 0x84, 0xA9, 0xA0, 0xA0, 0xA3, 0xE0, 0xEC, 0xBB, 0xA3, 0xBE, 0xA0, 0xA8, 0xED };
unsigned char s2[17] = { 0x98, 0xA4, 0xA5, 0xBF, 0xEC, 0xA5, 0xBF, 0xEC, 0x9F, 0x9C, 0x8D, 0x9E, 0x98, 0x8D, 0xED, 0xED, 0xED };
unsigned char s3[11] = { 0x82, 0xA3, 0xE0, 0xEC, 0xBE, 0xA9, 0xAD, 0xA0, 0xA0, 0xB5, 0xE2 };

char *decrypt(unsigned char *s, size_t n)
{
	for (size_t i = 0; i < n; i++)
		s[i] ^= 0xCC;
	return (char *) s;
}

#define DS(s) decrypt(s, sizeof (s))

int main()
{
	puts(DS(s1));
	puts(DS(s2));
	puts(DS(s3));
	return 0;
}

The decryption function is super-simple, but that’s not important for our purposes.

I disassembled the debug version of the program, because I didn’t want release optimizations like the decrypt function getting inlined. Not that it matters much, but in a real-world scenario a longer decryption function wouldn’t get inlined.

By going to the decrypt function, we end up to a jmp which points to the actual function code.

.text:0x0041114A decrypt                 proc start
.text:0x0041114A                                     ; CODE XREF: 0x00411465
.text:0x0041114A                                     ; CODE XREF: 0x00411487
.text:0x0041114A                                     ; CODE XREF: 0x004114A9
.text:0x0041114A   E9 71 02 00 00        jmp    sub_4113C0

At this point, the SDK offers us many possible approaches to find all occurrences of encrypted strings. We could, for instance, enumerate all disassembled instructions. But that’s not very fast. A better approach is to get all xrefs to the decrypt function and then proceed from there.

First we get the current view.

v = proContext().getCurrentView()
ca = v.getCarbon()
db = ca.getDB()

Then we get all xrefs to the decrypt function.

xrefs = db.getXRefs(0x0041114A, True)

We enumerate all xrefs and we extract address and length of each string.

it = xrefs.iterator()
    while it.hasNext():
        xref = it.next()
        # retrieve address and length of the string
        buf = ca.read(xref.origin - 6, 6)
        slen = buf[0]
        saddr = struct.unpack_from("<I", buf, 2)[0]

We decrypt the string.

s = ca.read(saddr, slen) 
s = bytes([c ^ 0xCC for c in s]).decode("utf-8")

At this point we can add a comment to each push of the string address with the decrypted string.

comment = caComment()
comment.address = xref.origin - 5
comment.text = s
db.setComment(comment)

As final touch, we tell the view to update, in order to show us the changes we made to the underlying database.

v.update()

Here’s the complete script which we can execute via Ctrl+Alt+R (we have to make sure that we are executing the script while the focus is on the disassembly view, otherwise it won’t work).

from Pro.UI import proContext
from Pro.Carbon import caComment
import struct

def decrypt_strings():
    v = proContext().getCurrentView()
    ca = v.getCarbon()
    db = ca.getDB()
    # get all xrefs to the decryption function
    xrefs = db.getXRefs(0x0041114A, True)
    it = xrefs.iterator()
    while it.hasNext():
        xref = it.next()
        # retrieve address and length of the string
        buf = ca.read(xref.origin - 6, 6)
        slen = buf[0]
        saddr = struct.unpack_from("<I", buf, 2)[0]
        # decrypt string
        s = ca.read(saddr, slen) 
        s = bytes([c ^ 0xCC for c in s]).decode("utf-8")
        # comment
        comment = caComment()
        comment.address = xref.origin - 5
        comment.text = s
        db.setComment(comment)
    # update the view
    v.update()
    
decrypt_strings()

It will result in the decrypted strings shown as comments.

This could be the end of the tutorial. However, in the upcoming 3.1 version I just added the capability to overwrite bytes in the disassembly. This feature is both available from the context menu (Edit bytes) under the shortcut “E” or from the SDK via the Carbon write method.

What it does is to patch bytes in the database only: the original file won’t be touched!

So let’s modify the last part of the script above:

        # decrypt string
        s = ca.read(saddr, slen) 
        s = bytes([c ^ 0xCC for c in s])
        # overwrite in disasm
        ca.write(saddr, s)

Please notice that I removed the “.decode(“utf-8″)” part of the script, as now I’m passing a bytes object to the write method.

This is the result.

.text:0x0041145E   push   0xD
.text:0x00411460   push   0x418000                        ; "Hello, world!"
.text:0x00411465   call   decrypt
.text:0x0041146A   add    esp, 8
.text:0x0041146D   mov    esi, esp
.text:0x0041146F   push   eax
.text:0x00411470   call   dword ptr [0x419114] -> MSVCR120D.puts
.text:0x00411476   add    esp, 4
.text:0x00411479   cmp    esi, esp
.text:0x0041147B   call   sub_411136
.text:0x00411480   push   0x11
.text:0x00411482   push   0x418010                        ; "This is SPARTA!!!"
.text:0x00411487   call   decrypt
.text:0x0041148C   add    esp, 8
.text:0x0041148F   mov    esi, esp
.text:0x00411491   push   eax
.text:0x00411492   call   dword ptr [0x419114] -> MSVCR120D.puts
.text:0x00411498   add    esp, 4
.text:0x0041149B   cmp    esi, esp
.text:0x0041149D   call   sub_411136
.text:0x004114A2   push   0xB
.text:0x004114A4   push   0x418024                        ; "No, really."
.text:0x004114A9   call   decrypt
.text:0x004114AE   add    esp, 8
.text:0x004114B1   mov    esi, esp
.text:0x004114B3   push   eax
.text:0x004114B4   call   dword ptr [0x419114] -> MSVCR120D.puts

I didn’t add any comment: the strings are now detected automatically by the disassembler and shown as comments.

Perhaps for this particular task it’s better to use the first approach, instead of changing bytes in the database, but the capability to overwrite bytes becomes important when dealing with self-modifying code or other tasks.

I hope you enjoyed this first tutorial. 🙂

Happy hacking!

Carbon Interactive Disassembler

Getting close to the release date of the 3.0 version of Cerbero Suite, it’s time to announce the main feature of the advanced edition: an interactive disassembler for x86/x64.

The initial intent was to enable our users to inspect code in memory dumps as well as shellcode. Today we have very advanced disassemblers such as IDA and Ghidra and it wouldn’t have made sense to try and mimic one of these tools. That’s why I approached the design of the disassembler also considering how Cerbero Suite is being used by our customers.

Cerbero Suite is heavily used as a tool for initial triage of files and that’s why I wanted its disassembler to reflect this nature. I remembered the good old days using W32Dasm and took inspiration from that. Of course, W32Dasm wouldn’t be able to cope with the complexity of today’s world and a 1:1 transposition wouldn’t work.

That’s why in the design of Carbon I tried to combine the immediacy of a tool such as W32Dasm with the flexibility of a more advanced one.

So let’s start with presenting a list of features:

Flat disassembly view

The Carbon disassembler comes with a flat disasm view showing all the instructions in a file. I don’t exclude it will feature a graph view one day as well, but it’s not a priority.

Recursive disassembly

A recursive disassembler is necessary to tackle cases in which the code is interrupted by data. Carbon will try to do its best to disassemble in a short period of time, while still performing basic analysis.

Speed

Carbon is multi-thread and seems to handle large files quite fast. This is very useful for the initial triage of a file.

Here we can see the analysis on a 60 MB chrome DLL performed in about ten minutes. And this while running in a virtual machine.

The challenge in the future will be to maintain speed while adding even more analysis passages.

x86/x64 support

Carbon supports both x86 and x64 code. More architectures will be added in the future.

In fact, the design of Carbon will permit to mix architectures in the same disassembly view.

Unlimited databases

A single project in Cerbero can contain unlimited Carbon databases. This means if you’re analyzing a Zip file with 10 executable files, then every one of these files can have its own database.

Not only that: a single file can have multiple databases, just click on the Carbon toolbar button or press “Ctrl+Alt+C” to add a new Carbon database.

And if you’re not satisfied with an analysis, it’s not an issue: you can easily delete it by right-clicking on the related Summary entry or by selecting it and pressing “Del”.

Scripting

As most of the functionality of Cerbero Suite is exposed to Python, this is true for Carbon as well. Most of the code of Carbon, including its database, is exposed to Python.

We can load and disassemble a file in a few lines of code.

    s = createContainerFromFile(a)
    obj = PEObject()
    obj.Load(s)
    
    c = Carbon()
    c.setObject(obj, True)
    if c.createDB(dbname) != CARBON_OK:
        print("error: couldn't create DB")
        return False
    if c.load() != CARBON_OK:
        print("error: couldn't load file")
        return False
    c.resumeAnalysis()
    # wait for the analysis to finish...

We can modify and explore every part of its internal database after the analysis has been completed, or we can create a view and show the disassembly:

    ctx = proContext()
    v = ctx.createView(ProView.Type_Carbon, "test")
    ctx.addView(v, True)
    v.setCarbon(c)

The internal database uses SQLite, making it easy to explore and modify it even without using the SDK.

Python loaders

I took early on the decision of writing all file loaders in Python. While this may make the loading itself of the file a little slower (although not that much), it provides enormous flexibility by allowing users to customize the loaders and adding functionality. Also adding new file loaders is extremely simple.

The whole loader for PE files is about 350 lines of code. And here is the loader for raw files:

from Pro.Carbon import *

class RawLoader(CarbonLoader):

    def __init__(self):
        super(RawLoader, self).__init__()
        
    def load(self):
        # get parameters
        p = self.carbon().getParameters()
        try:
            arch = int(p.value("arch", str(CarbonType_I_x86)), 16)
        except:
            print("carbon error: invalid arch")
            arch = CarbonType_I_x86
        try:
            base = int(p.value("base", "0"), 16)
        except:
            print("carbon error: invalid base address")
            base = 0
        # load
        db = self.carbon().getDB()
        obj = self.carbon().getObject()
        # add region
        e = caRegion()
        e.def_type_id = arch
        e.flags = caRegion.READ | caRegion.WRITE | caRegion.EXEC
        e.start = base
        e.end = e.start + obj.GetSize()
        e.offset = 0
        db.addRegion(e)
        # don't disassemble automatically
        db.setState(caMain.FINISHED)
        return CARBON_OK

def newRawLoader():
    return RawLoader()

Once you’re familiar with the SDK, it’s quite easy to add new loaders.

Raw / PE loader

Initial file support comes for PE and raw files.

This, for instance, is some disassembled shellcode.

In memory PEs

One of the main cool features is the capability to analyze in-memory PE files.

Here is the code of an in-memory PE:

Of course, the disassembly is limited to memory pages which haven’t been paged out, so there might be some gaps.

We haven’t played yet much with this feature and its functionality will be extended with upcoming releases.

Cross references

Of course, no decent disassembler can lack cross references:

We can also choose how many cross references we want to see from the settings:

Renaming

We can name and rename any location or function in the code. Duplicates are allowed. Any why shouldn’t they? We could have more than one method with “jmp ERROR” instances, even if the ERROR doesn’t point to the same location.

Make code/undefine

We can transform undefined data to code by pressing “C” or, conversely, transform code to undefined data pressing “U”.

Here we add a new Carbon database to a shellcode. As you can see it’s all undefined data initially:

After pressing “C” at the first byte, we get some initial instructions:

However, as we can see, the highlighted jump is invalid. By following the “jne” before of the “jmp” we can see that we actually jump in a byte after the “jmp” instruction. So what we do is to press “U” on the “jmp” and then press “C” on the byte at address 0xA.

After pressing “C” again at 0xA:

Now we can properly analyze the shellcode.

Functions

We can easily define and undefine functions wherever we want.

Exceptions

x64 exceptions are already supported.

Comments

One of the most essential features is the capability to add comments.

Flagged locations

You can also flag locations by pressing “Alt+M” or jump to a flagged location via “Ctrl+M”.

Lists

The shortcuts going from “Ctrl+1” to “Ctrl+4” present you various lists of things in the disassembly which you can go to.

Ctrl+1 shows the list of entry-points:

Ctrl+2 shows the list of functions:

Ctrl+3 shows the list of imports:

Ctrl+4 shows the list of exports:

Strings

What about a good-old-days list of strings? That can be created by pressing “Ctrl+5”:

Once we jump to a string we can examine the locations in the code where it is used:

The disassembly itself will try to recognize strings and present them as self-generated comments whenever appropriate:

Integration

Great care has been taken to fit Carbon nicely in the entire logic of Cerbero Suite. Carbon databases are saved inside Cerbero Suite projects just as any other part of the analysis of a file.

While Carbon already provides support for flagged locations, nothing prevents you to use bookmarks as well to mark locations and jump back to them. The difference is that flagged locations are specific to an individual Carbon database, while bookmarks can span across databases and different files.

Themes

Last but not least: some eye candy. From the settings it’s possible to switch on the fly the color theme of the disassembly. The first release comes with the following four themes.

Light:

Classic:

Iceberg:

Dasm:

I’m sure that in the future we’ll be adding even more fun color themes. 🙂

Coming soon!